Showing posts with label BBTB2. Show all posts

Fall Digi Stamp BBTB2 Challenge


Hello everyone.  It's another Bitten by the Bug 2 Monday with a stamp and frame challenge.  This week we have a sponsor at BBTB2, The Stamping Boutique, who provided digital stamps for the design team to use in this week's challenge.  We also had to use a frame from the Happy Hauntings cartridge with our digital stamp to complete our project.


We had a choice of several fall or Halloween themed images and I chose this cute scarecrow, who I do not believe could scare a soul!!   I used my Copic markers and colored image to be a night time pumpkin patch setting.  I especially like how my moon and night time sky turned out. 


I chose the loopy square frame from the Happy Hauntings cartridge to use with my card.  Using Cricut Design Studio, I stretched the frame into a rectangle, measuring so that it would fit my image. 

I used Just Because Cards to cut the base card as well as the green background on the card front.  I cut a rectangle to go across the bottom edge of the frame, and a tabbed index card for the top of the card. 


I found fun fall ribbon in my stash and added the ribbon to the index card as well as the top and bottom edges of the card.  I finished the card with an additional loop of ribbon and lots of black and white doodles.
If you have not already done so, please do go by and check out the other design team members' projects for the week.  Some of the projects are truly "WOW"-ers!!  Also, be sure to check BBTB2 this week for information on a new contest that will offer you the opportunity to win some great stamps from


Welcome Rookie Baby Boy Card


Hello everyone.  It's another Bitten by the Bug 2 Monday.  My talented design team sister Karen selected this week's challenge cut - the BASEBALL from LIFE'S A PARTY cartridge.   I used four cartridges to complete my project for this week's challenge:  Life's a Party, Baseball, Kate's ABCs, and Art Philosophy.  Additionally, I also used one Cricut Imagine Cartridge to print the fabulous coordinating cardstock for my card - Theresa Collins Baby Boutique. 

After designing my card in Cricut Design Studio I printed three 8 x 8 inch squares of cardstock with Baby Boutique, the Baby Boy Words print, the light blue with grey damask print, and a coordinating solid blue.   With additional white, black and brown cardstock scraps, I was ready to begin my card.


The base card was created by welding two baseballs together in Design Studio.  I also welded the shadow cuts for the baseball bat and the word Rookie to the top layer baseball.  I cut the base card in white American Crafts lightly textured cardstock. 

Next I cut the elements for the card front in layers, back to front.  The baseball bat was cut in a solid brown cardstock and a brown print paper.  The baseball bat cuts were adhered to the base card and the large black baseball was glued over top.  Next the baseball top layer, cut in Theresa Collins baby boy words, was added over the black baseball.


The word Rookie was cut from the Baseball cartridge in two  additional layers - a polka dot shadow and a light blue top layer.  I added black doodle dashes to the edges of Rookie.

The "Congratulations" tag was cut using the Art Philosophy cartridge.  I wanted to use one of the new Close to my Heart Art Philosophy stamps - "Congratulations on your ...".  After referencing the cut size listed beside the stamp on the acetate packaging, I cut the Theresa Collins blue and grey print top layer at 2 inches.  I then cut a light blue layer at 2.25 inches and a black layer at 2.5 inches.  I stamped the top layer and then attached all of the layers together.  I add the word "boy" to the bottom of the tag.


I used the negative cut from the baby boy words baseball (from the card front) and glued it to the inside of the card.  I welded the phrase "Welcome baby boy" using Kate's ABC's and using a xyron, attached the phrase inside the card.

I finished the card with a light blue polka dot ribbon bow around the bat.  An especially cute baby card for the baseball fan new parent!


I will be back tomorrow with another new project to share.  In the meantime, remember to drop by BBTB2 and check out the amazing baseball projects the design team is sharing.  Remember that it is also fun to play along on our weekly challenges!

If you would like more information on the Art Philosophy cartridge, stamps, and chipboard set, you can visit Melanie's Close to my Heart consultant site.   I love the versatility of this great set!

Blueberry Pie Recipe Card with BBTB2


It's a Bitten By the Bug 2 Monday here at Busy with the Cricky.  This week we are making pies!!!  My sweet design team sister Krista Norman chose this week's challenge cut, the pie from the Paper Doll Dress Up cartridge. 


What Krista could not know is that I will take pie any day over cake.  Don't get me wrong, I like cake, but pie is really my thing!!  I love the fattening flaky pie crust and the yummy fillings.  When I was at the lake last month  MFK, my friend Kathy, brought a gallon of blueberries from her yard for us to enjoy.  We had blueberries in yogurt, blueberries in cereal, blueberries in salad, Kathy's blueberry crisp, and finally, blueberry pie.  We found the recipe below on the Internet, but let me tell you, it is a keeper!!!  I have made it for Doug and I since returning home.


I decided to use the pie off of the Thanksgiving cartridge, but I hand trimmed the swirls of "steam" off of the pies.  I welded two pie cuts top to top so that they would open like a card.  I then cut the entire pie one more time in green gingham.  I cut just the pie top in a blue floral print and topped it with a lattice cute.  I used the lattice tag on French Manor to cut the pie lattice.


I used both Cindy Loo and Martha Steward Seasonal Art Cake cartridges for the fonts. I love these two font, Cindy Loo is so sweet and whimsical, while the MS Seasonal font is so versatile. 


Inside the card I printed the pie recipe into two rectangular text boxes, measured to fit the inside of the card.  I am not sure if I have shared this recipe previously, but you can copy it from the text below.


Blueberry Pie
Ingredients

• 3/4 cup white sugar

• 3 tablespoons cornstarch

• 1/4 teaspoon salt

• 1/2 teaspoon ground cinnamon

• 4 cups fresh blueberries

• 1 recipe pastry for a 9 inch double crust pie

• 1 tablespoon butter

Directions

1. Preheat oven to 425 degrees F (220 degrees C).

2. Mix sugar, cornstarch, salt, and cinnamon, and sprinkle over blueberries.

3. Line pie dish with one pie crust. Pour berry mixture into the crust, and dot with butter. Cut remaining pastry into 1/2 - 3/4 inch wide strips, and make lattice top. Crimp and flute edges.

4. Bake pie on lower shelf of oven for about 50 minutes, or until crust is golden brown.


I finished the card by adding a stamped expression to the front of the card.  The stamp is part of the all around sentiments set by Joy at Joy's Life.  I adore Joy's stamps and this all around set is awesome.  I used a round paper punch and a scalloped paper punch to create the stamped tag.

 
Be sure to stop by the Bitten by the Bug 2 blog and check out the design team members awesome pie projects.  Also, consider playing along and posting your project in the Mr. Linky spot at BBTB2.  Each week there is a play along winner who receives a special blog blinkie!. 

Back to School


Can you believe that it is already August, that for millions of teachers and students school is just around the corner and soon we will be basking in the luxury of fall temperatures? I confess that after our high today fall temperatures would indeed be a luxury! In honor of the approaching school year my dear design team sister Lori selected this week’s challenge cut. Lori gave us a wide range of choices by selecting any of the school cuts on the Locker Talk cartridge. I do not own Locker Talk, but I found some cute crayons on My Community and this great Back to School phrase on Celebrate with Flourish.


Using Cricut Design Studio and the My Community cartridge, I created a custom card design.  I welded the shadow cut of the three crayons to a square, adding two long thin rectangles across the crayons to hold them together.  As you can see after the words were added the rectangular bars a nearly invisible.

I had fun with my crayon colors, choosing bold prints as my crayons and crayon labels.  I then chose lime green for the contrast color.  


The Back to School phrase was cut in four pieces - the shadow in yellow, the icon cut in a white grounded multi print, a blue stripe and a darker blue solid.  In the end, I thought that the white background multi print was too light, so I colored over most of the white letters with a lime green Copic marker. 


I used pop dots to affix the words to the front of the crayons.  The dimension added by the pop dots allow for the letter to have a bit of a visual pop from the card.


While you are out and about on the Internet today be sure to drop by Bitten by the Bug 2 and check out the design team's fabulous back to school projects! The BBTB2 site will be up at 11 am eastern time. I like to post a bit earlier so as to not miss my early readers.

I will be back with a couple of fun projects to share this week – including a unique birthday card for my future daughter-in-law.

Summer Ice Cream Cones Blog Hop


Happy Monday and welcome to the Bitten by the Bug 2 monthly blog hop! This week we are celebrating summer with fabulous ice cream cones. If you are following the BBTB2 blog hop you arrived here from the amazing Maria’s blog. If you have not been following the blog hop, please consider doing so when you leave my blog.

 
My amazing design team sister, Maria (mentioned above), chose this week’s BBTB2 challenge cut – the ice cream cone from the Sweet Treats cartridge. The cartridge is on sale this week at Custom Crops, who just happens to be sponsoring my blog for this week’s blog hop! I just spent some time browsing the new items at Custom Crops, and I confess I peeked at the Sizzix sale too!


 I ended up working a bit extra on this week’s challenge.  I began by making the large card above while I was at the lake last week.  At the time I was not truly happy with the card so I decided to try again with the smaller card.  However after I arrived home, I attacked the chocolate topping and the phrase “frosty fun” with glossy accents and I realized that I loved the look of the chocolate topping! 


I cut the ice cream and the cone from Bazzill embossed cardstock.  I love the patterns of this cardstock.  I used a brown micro tipped pen and doodled on the embossed patterns – adding a dot to the middle of the flowers on the pink ice cream, and tracing the edges of the pattern on the brown.  I loved this look.


My second card is a three leveled flip open card.  I used the same techniques on the chocolate topping and the ice cream cone.  However, I used different cardstock for the ice cream.  I chose Basic Grey’s strawberry print cardstock for the ice cream layer.  I stamped the phrase “for you” on the edge of the chocolate topping.


The chocolate layer flips up and to reveal the ice cream layer.  You could add another stamp, a charm or a hand written not here.  The ice cream also flips up to reveal a white inner layer, where I stamped the phrase “Happy Birthday.” 


As I mentioned above, Custom Crops is sponsoring my blog hop this week by offering my lucky winner a $20.00 gift voucher.  You can shop the Custom Crops site and apply the voucher code to receive $20 off of your total!  As I also mentioned above, Sweet Treats is currently on sale at Custom Crops - just click this link for a great price on this wonderful cartridge!  Just leave a comment under this post, be a blog follower and you will be entered to win the gift voucher.  I will draw a winner on Thursday.


Thank you for hopping by today.  Your next stop is at PenniAnnies blog, the home of our very sweet Penny!  Penny has the MOST ADOREABLE project to share with you.  Enjoy!

Welcome Penguin Cottage Box


Happy Monday and Welcome to Penguin Cottage!  Today I am sharing my Welcome project for my new neighbor, which just also happens to be this week’s Bitten by the Bug 2 project… Two birds (penguins!!); one stone!  This week’s challenge cut was the Penguin from Jolly Holidays, but I do not have that cartridge so I used the penguin from Joys of the Season. 


I used three cartridges to create the completed box - Joys of the Season for the Penguin, Sweet Tooth Boxes for the box, and Cindy Loo for the word "Welcome".  I cut the house box so that it filled the 12 x 12 mat.  The house was much easier to assemble than many of the previous Cricut building that I have assembled.  Also, the house actually has many details that I omitted (flowers and flower boxes).   And like always, assembly instructions are available in the back of your manual!


I made it so that my penguin is actually a card which opens while still attached to the side of the house – a built in To:/From: card.   I welded two of the penguin shadow cut together to serve as the base card.  I used a light blue damask cardstock to cut the base layer of the penguin and I used a Swiss dot textured cardstock to cut the “coat”.  I covered the black cardstock with black Stickles.


I cut the word “Welcome” from Cindy Loo.  The word was cut to fit across the roof top.  The roof was cut in the same textured Swiss Dot cardstock as the penguin coat and was hand doodled in silver gel pen (my favorite white gel pen died just when I really needed it)!


I finished my Sweet Tooth box by attaching the penguin to the side and tying a fun green polka dot ribbon around the box. All I have left to do is fill the box with brownies and deliver it to my new neighbors!!
I will be at the lake this week with my scrappy girlfriends which means I will be “borrowing” Internet signal from the neighbors at the lake house. I will have several new projects to share, including an unusual bridal shower card. Hopefully everything will post.

Greetings from the Seashore


Happy July 4th - American Independence Day!  And, a bit late, happy Canada day to our neighbors to the north!  I am back with another Bitten by the Bug 2 weekly challenge.  Our design team leader, Heather, chose the cut of the week, the STARFISH from the Life's a Beach cartridge. 

Before I discuss today's BBTB2 layout I want to share my "vacation" week with you.  As I previously shared, Doug, Ian and I were planning a few days in Chattanooga to visit with Doug's family.  His sister  and brother-in-law were in from NM and we were excited to see them.  Well, the day before we planned to leave I woke up early in the morning ill.  I had a yucky tummy, headache, fever, body aches, etc.  At first I thought that I had one of those 24 hour viral deals that we have all had.  But no.... My virus turned out to be a three day ordeal...  In the meantime I had sent Doug and Ian on their way, promising to go the doctor is I did not feel better by the third day.  Thankfully the afternoon of the third day I realized that I was on the road to wellness!

I missed seeing everyone, and as heavenly as being home alone can be, this was not one of those times.  I was bored and was missing my family!  So I had a bit of pity party and then I got over it!!  Oh, and I did read three books last week so that was good!


As I stated above, today's BBTB2  challenge cut is the starfish from Life's a Beach.  I decided to create a girlie beach layout because I have TONS of photos from Bethany's years at the College of Charleston - I think she spent a lot of time on the beach!!!  I normally use blues and sand colors for the beach, but this time I went with topical pinks, salmon, etc.


I used five cartridges to create this layout - Life's a Beach for the sea life, Kate's ABC's for the title cut - Seashore, Billionaire for the cursive phrase, George for the rectangles and French Manor for the stamp shaped cuts.

I used Cricut Design Studio to design my layered title and multi-layered bottom edge border. 

Please stop by Bitten by the Bug 2 and check out all of the great Starfish projects.  Also, please consider playing along with us this week - you could be our weekly winner!!!


I have a three day project to share with you Tuesday, Wednesday and Thursday - a Patriotic picnic enhanced with Cricut!!!

Sunny Days with Celebrate with Flourish and BBTB2


Happy Monday and happy (HOT) summer!  This is my week to host the challenge cut at Bitten by the Bug 2.  In honor of the Summer Solstice, I selected a fun, summery cut - the phrase "Sunny Days" from the Celebrate with Floursh Lite cartridge! 


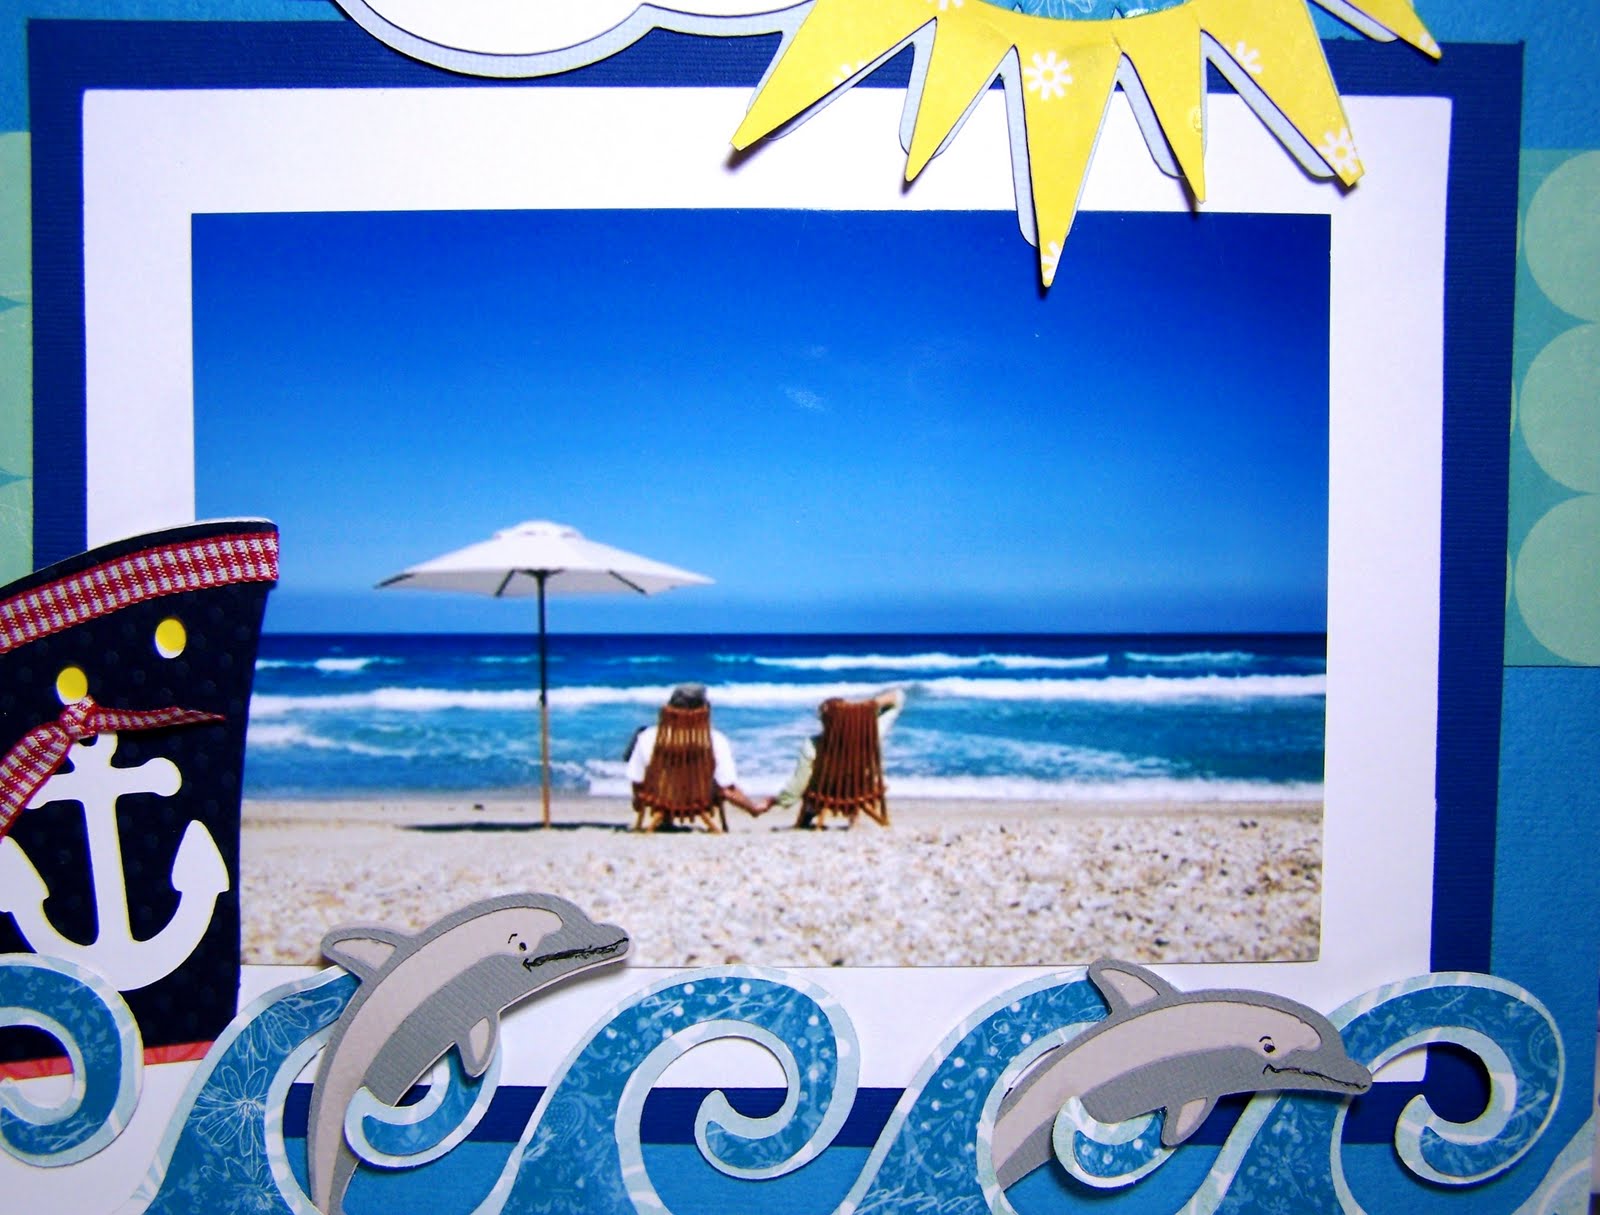
I designed this layout a month ago when I first selected my challenge cut.  The timing was perfect as my husband and I had just booked out first cruise!  Our 30th anniversary is in November so we decided to take a 6 night cruise to the Bahamas and Key West to celebrate.  We thought this cruise sounded like a perfect opportunity to introduce us to cruising - to get our feet wet, so to speak!


So, with "cruising on the brain" I combined cuts from Celebrate with Flourish and Life's a Beach cartridges to create this fun layout.  I used Celebrate with Flourish (CWF) to cut the Sunny Days phrase and the sun with clouds layered cut.  I love the layered look of the word phrases on CWF.  I confess that I have been utilizing a similar layering technique long before CWF was released. But using CWF makes the layering of letters MUCH easier.   I also really like the swirl cutouts - or flourishes - that are part of every CWF cut.  Such a fun cartridge.


I uses Life's a Beach (LIB) to cut the elements on the lower half of the page.  I cut the ship in multiple layers and had cut an additional bottom piece to make the ship taller.  I trimmed the ship out with ribbon, dashes and a cute little anchor. 


The double layer waves and the dolphines were also cut from LIB.  I had never cut the dolphines so I was a bit nervous about the tiny outline pieces.  But as you can see it all went very well.   The waves were cut in two layers - after welding two of each of the wave cuts together.  I thought the dolphins looked cut jumping out of the water between the waves.


I used this great beach photo on the layout, though truthfully I will probably make a matching page and save the layout for our fall cruice.  The photo mats will hold up to a 5 x7.  Sadly I was out of 5 x7 photo paper and had to print this photo at 4 x 6. 


If you have not already done so, please go by Bitten by the Bug 2 and check out the design team projects. I had a sneak peek and was WOWed by some of the great projects.  Also, please consider playing along with us on the weekly challenge.  Complete a new project this week using the "Sunny Days" phrase cut and post your project in the link area at BBTB2.  We provide a blog blinkie to the best project of the week, selected from those who chose to join us in the challenge.

Gnome Birthday Fun with BBTB2


Happy Monday!  Welcome to another Bitten by the Bug 2 weekly challenge!  This week's challenge cut was selected by my design team sister, the lovely Theresa Kelly, and  is any Gnome from the Freshly Picked cartridge.  I decided to have a bit of birthday fun with the Gnomes - creating this Gnome Pyramid birthday card.  The design for this card was inspired (and by inspired I mean ripped-off) from my friend Donna Mundinger's FABULOUS Penguin Card, which can be found here at her blog and  here at Custom Crops with design studio cut file and complete instructions.  Donna is one of THE MOST AMAZING paper crafters E-V-E-R... and I am thrilled to be able to say I know her! 


This card features six Gnomes each dressed in his favorite summer party outfit!  And just as we women match our shoes and purses (in an ideal world!), the Gnomes have matching hats, belts and shoes.  The well dressed Gnome likes for his outfit to coordinate!  The Gnome faces were stamped in light brown ink with Peachy Keen stamps.  A cherry Copic marker was used to highlight their lips. Their beards were cut in white cardstock, then heat embossed with white with touches of grey embossing powder.  Their ensembles were finished with tiny pom-poms at the top of their hats.


I used three cartridges to cut this card, Freshly Picked, George and Basic Shapes, and Christmas Cheer.  The banner above was cut from Christmas Cheer, then stamped with a rubber stamp from Michaels. 
The photo below is a screen shot of the card top in Cricut Design Studio.  I welded the six Gnome shadows together in a pyramid shape, adding birthday gifts from Christmas cheer.  I cut this layer in red, affixed it to the base card, and built the card front on top of this layer.


Below is the inside of the card.  You can see the red base cut (above) is the upside down red layer in the photo below.  I attached the red layer to the open cut triangle top.


The base card was created using George and Basic Shapes.  I sized and welded to triangles together, then inserted a NON-welded triangle into the middle of the top layer.  This created the cut out so that the blue swirl print shows through the holes in the front of the card.


I used metallic cardstocks to cut the packages and the belt buckles.  I finished the card by using pop dots to attach Happy Birthday banner!
 

Thanks for stopping by today.  Be sure to head over to Bitten by the Bug 2 and check out all of the designer's awesome projects!  And, if you have time, please consider playing along with us this week!!