Showing posts with label Birthday Card. Show all posts
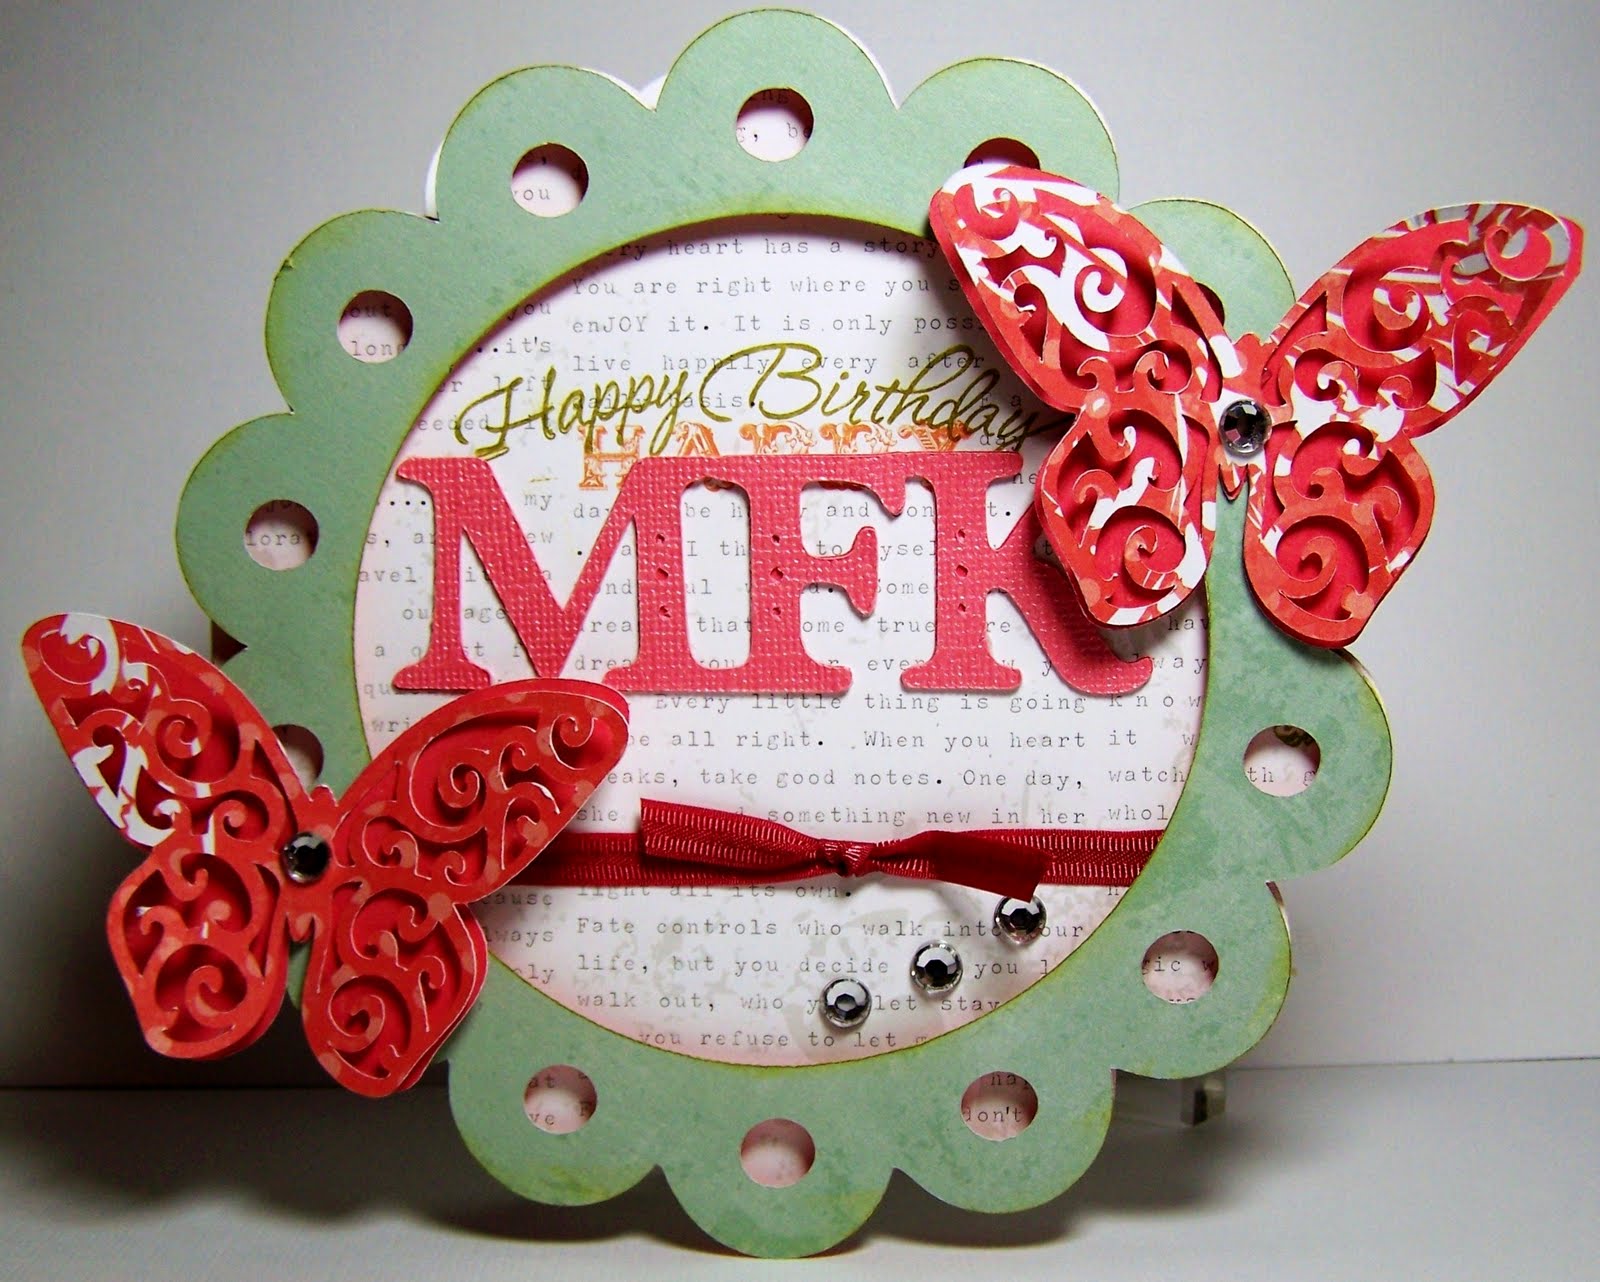
Belated Happy Birthday Wishes to MFK
I am not the best BFF! Truly ... My BFF, MFK (My Friend Kathy) celebrated the anniversary of her 39th birthday earlier this week and I am *just now* posting her birthday card. That is because I have yet to deliver said card to MFK! I know, I am a bad BFF!!
Actually Kathy will receive her card today - we are off to Charlotte, North Carolina for the Creating Keepsakes Convention and I will present her card when I pick her up. We are sooo happy that hurricane Irene has a more easterly path now; earlier in the week she was aiming for the Carolina's and we were a bit nervous about our weekend. But now our weekend is back to looking great.
I am signed up for seven classes, four on Friday and three on Saturday. I have never taken this many classes in one weekend before, but I am quite excited. I will share the details when I am home again on Sunday.
Okay, back to MFK's birthday card. Kathy is an awesome papercrafter so I tend to stress over project I create for her. This birthday card was no exception. I decided to use a cartridge that Kathy does not have yet, Art Philosophy (can you tell that I am truly enjoying this cartridge?).
I cut the base scalloped card in white cardstock. The other papers I used are from Echo Park's Victorian line. I used the words paper as a background for the front of the card. I topped the words with a pretty green scalloped circle frame. I used lime green chalk on the edges of the frame and pop dots to attached it to the card.
I love Art Philosophy's filigree detailed butterflies. I cut two of the butterflies using a solid cardstock for the bottom layer and a coordinating print for the filigree layer. I finished the butterflies by adding a gem to the body centers.
I added a ribbon and the same gems used on the butterflies to the front of the card. I also stamped the phrase, Happy Birthday to the front before adding the welded initials MFK.
Inside the card I stamped Happy Birthday again in the same lime green. I also added a vellum butterfly, colored with a copic marker. I added a little stamp to the outside of the envelope, but sadly I forgot to photograph the envie!
I promise to have a new post for you on Sunday giving you all of the details on the CKC convention and all of the new and fun products we find in the vendor faire!!
Labels:
Birthday Card,
C-Art Philosophy
Happy Birthday Peggy!
Today is my friend Peggy's birthday so I thought I would share her card with all of you! I used Art Philosophy and my E2 to create Peggy's birthday card.
I cut this wonderful shaped card using Echo Park's Victorian line of cardstock. The base card, the yellow print top layer and the pink-punch print frame were all cut at 5.5 inches. I also cut an additional frame, as there are two frames that coordinate with this shaped card(!), again at 5.5 inches, for the inside of the card.
I chose the cupcake cuts from the cartridge and cut them at 2.5 inches to match the stamps. I used a medium brown ink to stamp the cupcake details.
Have I mentioned that the stamps have the cut sizes written on the acetate cover? It's awesome. No guessing. When you choose to use one of the stamps that comes with the Art Philosophy cartridge, you just have to look at the stamp package to determine the correct cut size for your cricut cut!!
Next I used a piece of the coordinating chipboard, covered in the yellow print, framed in a coordinating solid. I used the Happy Birthday stamp, again from the CTMH set, to add my front and inside sentiments. I used a hole punch to punch holes in the chipboard and then I ran ribbon through the holes and affixed the tag to the card.
Above is a view of the inside of the card.
I finished the card by ACTUALLY sewing around the edges of the circle frame. I used a combination of zigzag and straight stitches. I added a few additional pen doodles and finally using small glue dots, I attached assorted pink buttons to the cupcake frosting!
Happy birthday, Peggy! I hope your day is super special as you are super special to me!
If you would like more information on the Art Philosophy Cartridge, stamps and chipboard set, visit Melanie Brown's Close to my Heart Consultant page.
Labels:
Birthday Card,
C-Art Philosophy
Dramatic Birthday Card
I know this is probably the oddest, least festive birthday card ever.... BUT.... My future daughter-in-law is a theater teacher and I am hopeful that this birthday card will appeal to the artsy, theatrical side of her personality.
I used Graphic45 papers on this card. There are actually two lines of Graphic 45 represented here, but as both are black, white and tan, I felt that they worked well together.
I used Cricut Design Studio with George and Basic Shapes and Base Camp to create this card. The Happy Birthday tag was created with Base Camp and stamped with a Stampin' Up stamp. Otherwise, every other element on the card was created with geometric shapes in George.
The theater comedy and tragedy masks are oval shapes from George with a moon shape cut out of the top. I used a pen and craft knife to draw and cut the eyes and mouth shapes. I cut the mask bottoms in the mime print cardstock. I cut one mask in the white and black print cardstock, which I cut in half and fashioned the facial features for the masks.
I added a wide black ribbon with a bow around the card and then I added a smaller black print ribbon to attach the tag. I like the tiny safety pin which attaches the tag to the bow.
Inside the card I used black ink and a generic Happy Birthday stamp I picked up at Hobby Lobby. And below you can get one more view of the bottom front of the card.
Thanks for stopping by today. It was nasty hot here today and I am sooo looking forward to the end of this summer and some cooler weather. Ironically we had one of our coldest winters ever last winter and now this nasty-hot summer. What can we say? Thank you, La Nina.
Labels:
Birthday Card,
C-George and Basic Shapes
Gnome Birthday Fun with BBTB2
Happy Monday! Welcome to another Bitten by the Bug 2 weekly challenge! This week's challenge cut was selected by my design team sister, the lovely Theresa Kelly, and is any Gnome from the Freshly Picked cartridge. I decided to have a bit of birthday fun with the Gnomes - creating this Gnome Pyramid birthday card. The design for this card was inspired (and by inspired I mean ripped-off) from my friend Donna Mundinger's FABULOUS Penguin Card, which can be found here at her blog and here at Custom Crops with design studio cut file and complete instructions. Donna is one of THE MOST AMAZING paper crafters E-V-E-R... and I am thrilled to be able to say I know her!
This card features six Gnomes each dressed in his favorite summer party outfit! And just as we women match our shoes and purses (in an ideal world!), the Gnomes have matching hats, belts and shoes. The well dressed Gnome likes for his outfit to coordinate! The Gnome faces were stamped in light brown ink with Peachy Keen stamps. A cherry Copic marker was used to highlight their lips. Their beards were cut in white cardstock, then heat embossed with white with touches of grey embossing powder. Their ensembles were finished with tiny pom-poms at the top of their hats.
The photo below is a screen shot of the card top in Cricut Design Studio. I welded the six Gnome shadows together in a pyramid shape, adding birthday gifts from Christmas cheer. I cut this layer in red, affixed it to the base card, and built the card front on top of this layer.
Below is the inside of the card. You can see the red base cut (above) is the upside down red layer in the photo below. I attached the red layer to the open cut triangle top.
The base card was created using George and Basic Shapes. I sized and welded to triangles together, then inserted a NON-welded triangle into the middle of the top layer. This created the cut out so that the blue swirl print shows through the holes in the front of the card.
I used metallic cardstocks to cut the packages and the belt buckles. I finished the card by using pop dots to attach Happy Birthday banner!
Thanks for stopping by today. Be sure to head over to Bitten by the Bug 2 and check out all of the designer's awesome projects! And, if you have time, please consider playing along with us this week!!
Birthday Cake Card for BBTB2
Happy Monday and happy Memorial Day to those in the USA. You may have arrived here from fabulous Theresa's blog if you are following the monthly Bitten by the Bug 2 blog hop. If you are just dropping by, continue on the blog hop when you leave my blog - after you enter the BLOG CANDY giveaway. This week's challenge cut at Bitten by the Bug 2 is the birthday cake from the Celebrations cartridge. I love this birthday cake - it is one of my favorite cake cuts. And even though there are newer birthday cartridges, I still love this "go to" original Cricut birthday cartridge!
I designed my card in Cricut Design Studio, welding two of the cake shadow cuts to create the base card and cut the card in aqua Bazzill cardstock. I used the Hide Select Contour feature and removed the cut space inside the tray legs on the the shadow, creating a solid, one piece shadow cut. Using Imaginisce B-day Bash line I cut a base layer in chocolate birthday candle cardstock. I build the rest of the cake on the chocoate birthday candle layer.
The top layers of the cake was created in three layers: back layer in lime green Core'dination cardstock, main cake layer in Imaginisce B-day Bash cardstock, and gold tray layer cut in metallic cardstock. After affixing the three laters together I tied a length of red Imaginisce ribbon around the cake and added the Happy Birthday phase (cut from the Batman cartridge) to the front of the cake. I then used pop dots and attached the cake to the base card.
I cut the background cake layer in smooth white cardstock and affixed it inside the card and added another Happy Birthday cut. This is the perfect surface the shape on which to write a personal birthday message.
To finish the front of the card I added two of the three candles from the cake cut. I also added an Imaginisce cardstock embellishment birthday cake to the top of the cricut cake - turning my cake into a four tiered cake!! The cake was then blinged out with various sizes of gems.
Did I mention BLOG CANDY and blog hop??? Thanks to the AMAZING CUSTOM CROPS I have wonderful blog candy to offer you! How about a $20 gift voucher for shopping at Custom Crops??? I would love that so I bet you would too! All you have to do to be entered into the random drawing for the blog candy is
1. Be a follower of this blog, and
2. Leave a comment under this post.
I will be posting the winner on Thursday.
Now that you have enjoyed (??) my blog post, you have become a blog follower, left your comment below and taken note of the Custom Crops it is time to continue on to the next stop on the blog hop. You are off to see the lovely Penny of PenniAnnie's. Enjoy the rest of the blog hop and if you have not already done so, please drop by Bitten by the Bug 2 look at all of the design team projects.
Labels:
BBTB2,
Birthday Card,
Blog Candy,
Blog Hop,
C-Batman,
C-Celebrations
Toy Story's Woody Birthday Card
Hey there cowpokes! I have a rootin' tootin' third birthday card for Carter, my adorable nephew to share with you today. Carter really likes his rocking horse and his cowboy hat, not to mention his addiction to Toy Story, so this card is perfect for him.
Some of you may recall that when I made a Woody layout for Carter's scrapbook I forgot to look at the photo of Woody and I "sort-of" dressed him in his laundry day outfit. I got it together this time and checked the photo before cutting. My only edit was to change his shirt from yellow plaid to yellow with dots.
My issue with this particular Woody, other than all of those teeny-tiny pieces, is the make up job. I hope Carter understands that Aunt Susan was a bit heavy handed with Woody's stage make up!
I chose a few coordinating pieces of cardstock from my scraps to use a layered embellishments. I added brads to the center of the design on the brown print. I used a Stampin' Up happy birthday stamp on the aqua wood grain cardstock.
Inside the card I used Theresa Collins phrase/word stamps that came in a three sheet set from HSN. I love this set because it has so many useful words and phrases for so many occasions.
I have completed a 12x12 scrapbook full of fun layouts and cute Carter photos to send for Carter's birthday party later this week. I had forgotten how fun it is to scrap for a younger child. Alas, maybe someday I will have grandchildren to scrap for!!
Labels:
Birthday Card,
C-Just Because Cards,
C-Toy Story
Happy Birthday Card to Wrap Up a Fun Week
What a week it has been! The only think that could possibly top Cricut's 5th Birthday Party and release of the Expression 2 was a Royal Wedding! I may need the weekend to recover from this fun, fun week. I thought I would wrap up the week with a fun birthday card.
The card was created using Imaginesce cardstock and chipboard stickers, the I-Top tool, Stampin' Up stamps, and a Stampin' Up punch. I really like the bright and festive look of this card. The cake and present chipboard stickers really pop off of the brown cardstock on the cover, but then I took the card to the next step. I added a stamped and punch tag, color coordinating flowers, and an I-Top brad.
I like the fold of the card. Begin with a 12" strip of cardstock. Fold the cardstock in half. Then fold the top half of the card in half again, folding back toward the fold. You will create an uneven Z fold. You then attach a small rectangle to the top half of the card. The photo above shows this fold far better than I could possibly explain it to you.
The top of the card pulls to the left to open. Inside the card I stamped Happy Birthday again and left plenty of space to write a personalized message.
Labels:
Birthday Card,
Stampin' Up
Warm Winter Birthday Wishes
Happy Wednesday everyone. We are halfway through the first week of 2011. I bet all of you teachers out there are counting the hours until Friday afternoon after two weeks off. My son's school district scheduled a teacher work day on Monday to help them transition back to school. He was thankful for the transition day.
We have two family birthdays in January, my mom and my daughter. Their birthdays are one week apart - Bethany was late and my mom was annoyed that Bethany refused to be born on her birthday. I wanted her to come by Christmas so I had not sympathy for mom's annoyance!!
Anyway, this is mom's birthday card. Inside the card, which I forgot to photograph, reads Warm Winter Birthday Wishes! I used Bazzill cardstock and Echo Park cardstock; Spellbinder's Snowflake Pendant 2010, Label #14, Lacey Circles, and regular circles dies; JustRite stamps and Popcorn the Bear stamps; Stampin' Up ink and ribbon to create this card. Oh, and a Spellbinder's embossing plate.
I wanted a winter themed card that was both feminine and fun and I believe that this card met those goals. I used Bazzill shimmer cardstock and Spellbinder's Snowflake Pendant dies to cut the adorable pink snowflakes. I used a pink ink to stamp the circle and lacey spellbinder dies with JustRite stamps. Again, going for feminine with all of the pink, yet fun with the embossing and less formal stamps.
I had trouble finding a Happy Birthday stamp for the front of the card. I am not sure where I stashed all of my birthday stamps. I finally used a Popcorn the Bear "Happy Birthday" stamp.
I should be back tomorrow with another Spellbinder based project.
Labels:
Birthday Card,
JustRite Stamps,
Nestabilities,
Spellbinders
Batman Birthday Set
We had a birthday in our family last weekend. We celebrated my son Aaron's birthday - my son Aaron's 25th birthday! Aaron is a fun man. He believes that Batman is the greatest super hero ever because he is sure that Batman has something in his bat belt to take out any other super hero. Aaron and I had a conversation going on via facebook where we were debating who was better, Batman or Superman. I thought (apparently in error!) that Superman could take Batman. Batman is after all a mere human where as Superman is from another planet. Superman can fly, repel bullets, has laser vision, etc. Just as I finished stating my case Aaron informed me that he is sure that Batman keeps Kryptonite in his utility belt just in case Superman needs taking down! Such intellectual debate!
It matters not that Aaron is 25, I decided that Batman should be the theme of the day. One of Aaron's gifts was Converse All-Star high top sneakers - with Batman and Gotham cartoon print fabric! Aaron is a high school teacher so I am sure his new footwear will be a hit with his students! As the sneakers set the theme, I decided to let Batman be apart of his other gifts. I found a Batman gift bag at a local store and it was perfect size for the hardcover book we had for Aaron.
Using black, navy, cream and yellow cardstock I made a Batman birthday card and envelope. I used Design Studio and welded two Batman heads together to create the card shape. The face and mask elements were cut to size for the card. A skin tone Copic marker was used to color Batman's face - though I did wonder if he should have a five o'clock shadow! The Batman font was used on the card, except for the O; I used a circle and the bat emblem for the O.
For Aaron's smaller gift I created the 3-D Gotham box from the Batman cartridge. The box was super easy to make, even with my one change to the pattern. The box is supposed to close under the bat emblem, but I decided to add sticky velcro under the light beam.
Aaron LOVED his sneakers. He also liked his other two gifts even if they were not Batman related. He laughed at his Bat card and gift box!! Who would have thought that Batman would be such a hit for my son's 25th birthday!! Well, actually I guess I did. After all, I only purchased the Batman cartridge BECAUSE of Aaron!!!
Labels:
Aaron,
Birthday Card,
C-Batman,
Card and Gift Box
Epic Card with Imagine and JT
I know this is not my usual paper craft style, but I am putting this out here anyway. This Epic card was created with the Cricut Imagine and the Cricut Imagine JT cartridge. I also used an Imagine pre-loaded shape as the background mat. And in keeping with my theme of Imagine elements, I also printed the background paper from the JT cartridge.
There are so many things I could share about how wonderful the Cricut Imagine is to work with, but today I am going to focus on just one particularly appealing aspect of the Imagine. My friend Susan from Seneca said that she loves the Imagine because all of the papers and colors on a single cartridge are already coordinated for her! She likes knowing that the selections she makes will all look wonderful together in her completed projects.
In this specific project I chose the flourish accented skull and the wing accented word Epic as my main elements. Using the layers feature on the Imagine, I split the skull cut into layers and recolored the top layer, the face, with the skull print paper on the JT cartridge. I thought it would be more striking if the skull had skull print. I will say that you loose a few details when you cut the skull alone, but it is worth it for the layered effect.
I cut the word Epic using only two layers. You can actually choose to cut this piece in four layers, but I liked the overall print better. I cut this in two layers so that I could layer to two pieces. The headphones were cut as a single layer. I did not want the headphones to over power the skull.
The photo above shows the inside of the card. I used just a top layer of the skull with a larger set of headphones. This leaves plenty of room for personalizing the card. I see this card as a potential birthday card for one of my sons (both have birthdays in the next 60 days). While one son is very into music the other often uses the word Epic! Alas, there will be choices to make....
After layering the elements together I added think black and white gingham ribbon over the tag matting, but under the skull flourish. I tied the to strips of ribbon together with rough twine. I added a touch of the twine around the i in epic. I actually tried using wire as an embellishment for this card, but it blended together too well and there was no POP effect.
I will be back tomorrow to share an on-going project with you. See you tomorrow.
Labels:
Birthday Card,
CI-Basic Shape,
CI-JT,
Cricut Imagine
Subscribe to:
Posts (Atom)