Showing posts with label C-Storybook. Show all posts

A Winner and A Storybook Easter Banner


Thank you all so much for entering the Sewing Box giveaway.  I wish that every single person who signed up could win, but alas I could only pick one.  Using Random.org and a spread sheet where I entered each entry into the database which applied a number to each entry (with multiple entries for those who used entered multiple ways) I was able to feed the numbers into random.org and the winner was selected. 

And the winner is:
Congratulations to JORDANBEV5!  You will be receiving this fabulous cutting mat from The Original Scrapbox.  AND you will be in the drawing with nine others for the grand prize of a Sewing Box!  Best of luck to to you.  But remember, in order to claim your prize and move on in the competition I need you to contact me at spartansus@gforcecable.com by tomorrow, Wednesday April 20th at 2pm (MST) or I will have to draw a new winner. I will need your full name, address, and phone number.


Now on the banner:   Happy Easter Week! The date may fall a bit late this year, but I have been enjoying the Easter decor for over month now. I love the soft spring colors that we associate with Easter. Last fall I created a fall banner for BBTB2 and I liked the banner so much that I had to have an Easter banner also. This Easter banner was created using the Cricut Craft Room!!!

The cut file is nine pages long because of the size of the letters.  I used the Storybook cartridge to create the letters.  Included in the cut file are the icon cuts, decorative top cuts and the shadow cuts.   And I have posted this as my first Craft Room cut file to download!!!


When selecting paper for this project I literally sat in the floor surrounded by cardstock.  I began by selecting six spring colored prints for the decorative cuts.  I followed that by selecting two solids to to cooridinate with each of the prints.  And finally I went through my canisters of large flowers and selected flowers to match each of the letters.


I do want to share with you a couple of the features that I like best about the Cricut Craft Room.  I love that you can place items on the mat and then group and move some or all of items at will.  I also like that when cuttting the program automatically advances to the next page.  You do not have to select the next page as you do with Design Studio or the Gypsy.  Also when cutting, when you load the mat and then cut, the mat automatically unloads. 

When I design in DS I tend to look at the entire mat.  The zoom out and zoom in features allows me to do that with the Cricut Craft Room.  And you will never forget to weld again!  The program asked you each time you add a new image if you want to weld or not!

Hopefully the Craft Room will be open to all of you soon.  If you use the Gypsy or Design Studio you will catch right on to using the Craft Room.  It truly is very easy to operate!  Aren't you excited????


I will be back tomorrow with another project to share!

She said yes - - Everyday Cricut Project


Happy Saturday everyone.  Sorry to have been MIA all week - I was dismantling my Christmas decor and working on some Spellbinders projects.

To make up to you for being gone all week I am the Saturday designer at Everyday Cricut.  Okay.  Really.  It is just my normal Saturday at the Everyday Cricut blog but I AM sharing!

This week's project is called, She said yes!  My older son proposed to his girlfriend during the Christmas holidays and Crissie said yes to marrying Aaron!  As you might have guessed, my husband and I are thrilled. This layout is one that I will actually use in their scrapbook, but the photos were quickie computer printouts.  The real photos are still being printed. 

For all of the details on creating this layout, including cartridges, please head over to Everyday Cricut.  There are also additional photos on the EC blog.

I will be back on Monday morning with a fun Bitten by the Bug 2 challenge project.   Have a wonderful long weekend!

Kickin' Off Christmas Blog Hop Day 1


Welcome to the Kickin' Off Christmas Blog Hop!  You may have arrived here from Penny Duncan blog.  This blog hop will feature SP and Company Products and Amy Chomas Products.  Both companies off have wonderful and unique crafting tools. 

Now that I have finally begun my Christmas shopping I have also begun to think about packaging and wrapping.  I love nice packages and bows and tags.... And I love the look of the packages under the tree.  This year I thought I could craft a few personalized boxes and bags just to make things a bit more special.


For today's box I used the square box on the Bags, Tags, Boxes, and More cartridge.  I cut the box in red cardstock and covered the top and side squares with fun Christmas scrap paper.  


Using Stampin' Up Red Riding Hood red ink and SP and Company Christmas tree stamps, I stamped red trees onto smooth white card stock.  I used micro tipped scissors and cut out the trees.  The trees where then attached to the sides of the box using pop dots. 


Next, returning to the Cricut I used the Amy Chomas gel pen holder and the Create a Critter cartridge and wrote the word JOY on red cardstock.  I used the Storybook cartridge and cut a tag shape around the work JOY.  Using pop dots the red tag was affixed to the top of the box.


I also created a matching gift card to go with the gift box.  I cut a white base card and attached a red cardstock square topped with fun Christmas paper to the front of the card.  Just as I did for the top of the box, I used CAC and SB to create the red tag for the front of the card.  I also popped a stamped tree to the front of the card.


I truly think the SP and company stamps work well with my Cricut cut gift box and card set, and that the Chomas Pen holder added a perfect finishing touch to the card and box.  I really like to mix stamping in with my Cricut cuts.


Before you hop on be sure to leave a comment below.  Everyone who leaves a comment will be eligible for a Custom Crops gift voucher drawing.  Remember that Samantha is also giving away a stamp set.  And finally, I will be giving away a copy of my DVD set, It's a Kid's Life - which features 18 layouts, video and pdf instructions along with cut files.  I will choose someone from all of the Tuesday and Wednesday comments.

After leaving your comment below, the next stop on the blog hop is the Cards by Linda blog.  Enjoy your hop!!!

I will be back tomorrow with another blog hop project. 


Susan Edwards You are Here!!

Chocolate Bar box for my favorite Gobblins


Happy Monday bloggers!  My first project of the week is the weekly BBTB2 project.  This week's challenge cut was selected by the lovely and amazing Regina Easter!  Regina chose the crayon box on Cricut's Tags, Bags, Boxes, and More cartridge.  For those who may  be interested, the last time I checked TBBM was available at the Cricut rewards site for 800 points.


Obviously I chose to go with a Halloween theme for this challenge.  I was thinking of my favorite little neighborhood gobblins and designed a spooky-fun box to hold full-size Hershey chocolate bars.  As an added bonus the will also hold two of my large cut out sugar cookies! 


I used several additional cartridges to decorate my tick or teat boxes including: Storybook for the the tag, Happy Hauntings for the fence with the creepy bird and the bat, George for the moon shape and background rectangle, and Celebrate with Flourish for the Happy Halloween title cut.  I used fun Halloween papers and I added a square of sticky Velcro to the flap for secure closure.


I embossed the tag and added white pen dots to enhance the edges.  I also added black dashes around the half moon on the flap.  I finished the box off with a bit of black rick-rack along the top edge. 

If you have not already been by the Bitten By the Bug 2 blog today, click on the name and you can view the design team's amazing projects.  I will be back tomorrow with a new Yudu project to share!!


Birthday Scrapping and Trying a New Product


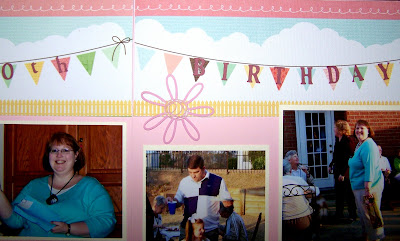
I had fun in my scraproom today.  In addition to working on a "to be revealed later" project, I also did some scrapping of the Birthday photos.  I used a new (to me) product on the scrap pages, Fabric Paper by Dear Lizzie and American Crafts.  It is fabric that is backed with an ultra-thin adhesive foam. The fabric paper cuts nicely with my paper trimmer, though I did not try it on the Cricut today.  Don't worry, I have more of the fabric paper and that will be my next experiment.

 
I purchased my fabric paper at Taylored Expressions.  I used two sheets of the 12 x 12 inch fabric paper, removing the middle section with the trimmer (and saving it for later - I am thinking cute cards!).  I also purchased a package of the 6 x 6 inch fabric paper and plan to use it on some cards.


I used Base Camp and Storybook cartridges to complete my layout.  I cut the phrase Happy 50th Birthday with Base Camp and attached the letters to the flag banner at the top of the fabric paper. I then cut a two layer tag using Storybook where I matted the computer printed journaling.  My friend Kathy gives me grief for not journaling often enough so I am working to mend my ways!


I cut an extra tag set and affixed it under the edge of one of the HUGE-I-FIED Prima flowers.  The other Prima flower is on the left page, afloat on a field of flowers.  I used three lazer cut pink flowers from my stash of long ago purchased die cuts.  Between die cuts and alphabets that I no longer purchase, I should be saving money... Well, except for those new cartridges!!


I have to say that I quite like the Dear Lizzy Fabric Paper and look forward to using more.  I am not sure where else you can purchase the fabric paper, but I plan to "google" it and find out if there are other patterns.

My First Glass Etch Projects


I have been so intrigued by the glass etch projects made with vinyl and Armour Etch which I have viewed at various blogs that I decided to have a go at etching.  After Christmas I purchased 9 inch tall hand blown candle sticks on close-out sale.  I thought they would be perfect for etching as there is a 1 inch rim at the top edge.  I also thought the close out price was a plus as this was a new craft for me.


I used Design Studio and Storybook to cut a design in scrap cricut vinyl I had in a drawer.  I used the negative part of the cut and applied the vinyl pieces to the glass.  I then filled in the vine-flower design with Armour Etch. 


I did not realize that the Armour Etch cream would drip, but it did.  Right down onto the bulb area in the center of the candle stick.  I tried a couple of fixes but found all attempts to deal with the drips lacking.  So finally I realized that I could etch the whole bulb area.  I am actually quite pleased with this effect.


I purchased candles at Hobby Lobby and now I am all set with cute Valentine gifts for my daughter and my son's girlfriend.

Busy, Busy Week of Designs


I have a busy week with designs posted in different places.  Today I am a guest designer at the FABULOUS Christmas With The Cricut site.  I love CWTC.  These ladies inspire me every single day!  And in addition to being great designers and awesomely creative, they are three of the nicest women you would EVER want to meet.


There are two other guest designer projects at CWTC also - when you go by, and you should go by CWTC, be sure to look at Teri's and Christina's holiday home decor ideas.